Chip Greens' hairbrained schemes....

Chip Green

In Bloom
Its just a matter of getting some sort of grow media, to stay in contact with the area long enough, without too much disturbance. It's gotta stay near wet, but not soaked. It's nice to be able to see, if/when roots develop.
I use cut up 1 gallon freezer bags for large areas with soil, or coco(pencil sized branches+), and quart sized for the cube method, for lesser diameter pieces. Scrape some skin off, whack some nodes, ya know?
I put a pipette squirt of Dip N Grow (X5 dilute) in the cube, or even a couple pumps into a soil/coco ball.
 
Last edited:

HydroRed

3Thirteen Seeds
Staff member
Administrator
Moderator
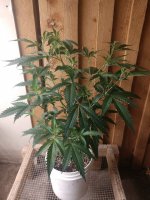
Going air layer to save this Bag of Oranges x Citrus Milf chuck. The lone two clones, of these clones, went full on cooked celery stalk on me, 14 nights after the flip. If I'm reveggin' it's going to be a teener sizer. View attachment 91753

Thats pretty damn cool. Ive never messed with any kind of rooting outside of the normal rapid rooter method or the bubble cloner. Im intrigued to say the least. Also I didnt realize you had a BOO x CM you were keeping around. I ran a handfull of the BOO when he first made them and I got 2 phenos (a green and a black) and loved both of them. One of the strongest "realistic" orange strains I've run over the years. Do you have any pics from the grow of this cross?
 

Chip Green

In Bloom
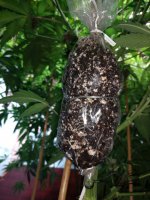
Looks like this chuck is secured. A few days ago, I spotted the first root on the soil ball air layer. Here's a current picture, this is 27 days after application.
IMG_20211215_162513101.jpg
This will remain intact for several more days, to ensure the fishbones continue to spread. The top was slightly opened today, in order to re moisten the glob with Megacrop. That should kick the rooting into overdrive.
No reason to cut it off just yet, the rooting has only started.

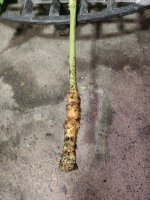
The same day I saw the first root tip, I cut off the "Root Riot" cube layer to see what it looked like. Mostly callus, not any roots to speak of, and some sort of white fungi was present. I stuck it in wet soil, and today I pulled it out to see it. About the same. It never went limp, but it's stuck in a callus state.
This time, this plant, the soil pack out did the cube. IMG_20211215_162250371.jpg
This cut goes back into wet soil, for a hail mary attempt at a second piece.
These "cuts" are currently 39 nights into flower, after good roots are established, a reveg process will begin.
 

Chip Green

In Bloom
Successful reveg, of the Rhubarb.
The rhuveg of the rebarb took over 60 days from the bulk harvest, before I had the sack to cut any clones. This photo was around day 52.
So the remainder of the flower, has been cooking for an astonishing 130 days, and hasn't rotted off.
The air layers, initially had rooted well, may have been taken prematurely, alas failed to thrive, and perished. Fortunately, this one of a kind chuck(Citrus Milf x Bag of Oranges) looks to be secured, at this juncture.
IMG_20220302_103128304.jpg
 

PlumberSoCal

? Guy Fire-y ?
Successful reveg, of the Rhubarb.
The rhuveg of the rebarb took over 60 days from the bulk harvest, before I had the sack to cut any clones. This photo was around day 52.
So the remainder of the flower, has been cooking for an astonishing 130 days, and hasn't rotted off.
The air layers, initially had rooted well, may have been taken prematurely, alas failed to thrive, and perished. Fortunately, this one of a kind chuck(Citrus Milf x Bag of Oranges) looks to be secured, at this juncture.
View attachment 109194
reaction-habberdash.gif
 

WillieP

In Bloom
Hey Chip,
I live in a state with a plant count restriction.
I have always been interested in using the air layering method as a way of cloning and it not counting against my plant count.
(I can clone but can only have 5 plants taller than 5 inches.)
I've watched a bunch of the 'how to' YouTube videos but have never attempted it.
Would you mind giving me your run down on the method you would recommend?
Use rooters? How long do you need to leave them in place? Any tips or tricks.
Thank you, Sir.
Cheers,
WillieP
 

Chip Green

In Bloom
How long do you need to leave them in place?

This is variable. I've had roots explode into Coco coir in as little as 10 days. Most times within 3 weeks Ive had root development.

As far as the rooter method(I used root riot) I've had very little success. Plain old soil, or as mentioned Coco coir has worked out the best.

I start with some type of clear plastic. Usually a freezer bag, cut apart at the seams. Twist ties will hold the bottom end in place, after wrapping the targeted stem zone. I try to find a good 6"-8" section if possible. I've pulled it off with smaller, but it's maddening. I sorta make a tube with the plastic. It will take more plastic than it looks like it should, to get a full wraparound. Once the tube is secured on the base, I start to add the wet soil/Coco. It's a pain in the keester to keep everything in place, there is usually cussing, and occasional tantrums. It ended up becoming spoonfuls at a time, and a gentle pack downwards, slight adjustments and repetition.
It's tricky to keep the flimsy plastic tube intact, until it starts to fill. Keeping the wraps from separation is also irritating.
Once it's full, secure the top of the wrapper tube with another twist tie, or wire or what have you. I like the clear wrappers, so I can see the moisture, and know it's not dried out. Also, the first signs of rooting. My experience says, let the roots grow until you can see bunches upon bunches.

The idea, is to keep enough wet(ish) grow media intact around the stem, with as little disturbance as possible, until the roots have a chance to get established.
 

WillieP

In Bloom
This is variable. I've had roots explode into Coco coir in as little as 10 days. Most times within 3 weeks Ive had root development.

As far as the rooter method(I used root riot) I've had very little success. Plain old soil, or as mentioned Coco coir has worked out the best.

I start with some type of clear plastic. Usually a freezer bag, cut apart at the seams. Twist ties will hold the bottom end in place, after wrapping the targeted stem zone. I try to find a good 6"-8" section if possible. I've pulled it off with smaller, but it's maddening. I sorta make a tube with the plastic. It will take more plastic than it looks like it should, to get a full wraparound. Once the tube is secured on the base, I start to add the wet soil/Coco. It's a pain in the keester to keep everything in place, there is usually cussing, and occasional tantrums. It ended up becoming spoonfuls at a time, and a gentle pack downwards, slight adjustments and repetition.
It's tricky to keep the flimsy plastic tube intact, until it starts to fill. Keeping the wraps from separation is also irritating.
Once it's full, secure the top of the wrapper tube with another twist tie, or wire or what have you. I like the clear wrappers, so I can see the moisture, and know it's not dried out. Also, the first signs of rooting. My experience says, let the roots grow until you can see bunches upon bunches.

The idea, is to keep enough wet(ish) grow media intact around the stem, with as little disturbance as possible, until the roots have a chance to get established.
Thanks for taking the time to give us/me the play-by-play CG!
So, it sounds like to me that if I Veg for 8 weeks that I can let the plant grow for 4 weeks then apply the 'air layers' and still have 4 weeks to root out before I would flip to flower. That sounds like something that would work for me with the way I am currently running things. Seem like that with 4 weeks of growth before applying and 4 weeks after, that you should be able to have a really nice sized clone out of the deal.
Appreciate the assist,
WillieP
 

Chip Green

In Bloom
HydroReds' STS reversal kit strikes again! This is actually the remainder of the revegged Rhubarb previously pictured. After clones were secured, I mixed a quarter batch in a 2oz spritzer bottle. Three applications, and 19 days later, it's full on he-her.
IMG_20220420_093506716.jpg

Here's a pregnancy photo of my Citrus Milf. This reversal pollen was in the freezer, after a thaw, and a few days rest, it's just as viable as the day it was stored.
IMG_20220420_093554653.jpg


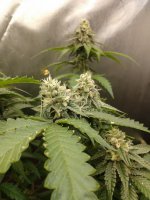
Last but not least my Hazeman Mikado creeping into ripeness.
IMG_20220420_093312705.jpg
 

Attachments

  • IMG_20220420_093312705.jpg
    IMG_20220420_093312705.jpg
    532.6 KB · Views: 2
Top Bottom