Captain Sternn
Amicable Cannastronaut
When I got them out for the pic there was a second when I thought I'd have the exact year, they were in a cigarette pack cellophane, so tax stamp. Most of the stamp had flaked off lol.


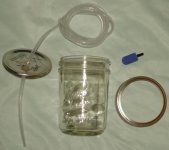
Thank you for throwing that on the table. I won't actually do anything with them until next spring, I couldn't finish them this year. LOL I'm going to confess it crossed my mind reading that, it sort of resembles seed implosion and I saw myself putting an Oceangate label on the jar so if they die it's perfectly understandable.was checking to see if anyone already posted this. but a germination "bomb" might be your ticket if you havent popped em already. i stole the pics since i tossed mine a while ago, but it does work, perhaps too well.
you need-
standard size mason jar, w/lid gasket and ring
1/4" ish drill bit (size of air hose)
air hose, air pump, check valve & air stone
superthrive (i know its gross. can be swapped out for a similar B1 nute)
-
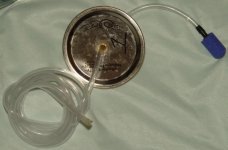
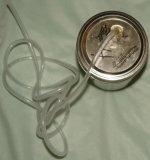
punch/drill a hole in the lid, without hurting yourself or destroying the jar
run the air hose down inside jar until it reaches the bottom
connect air stone
put a glob of hot glue where air hose hits lid
put 5-10 drops of superthrive (or similar B1 nute) inside
fill with tap water
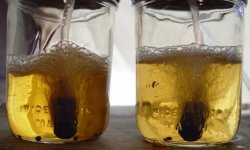
hook up hose to air pump, and use a check valve!
close tightly
fire it up. the seed shells should all open no problem. if anything its a little too effective. 24 hours should be more than enough time in the machine to achieve some result. the original recipe called for traditional sowing on warm soil layer once the shells are busted off. tbh if you see tails, plant em. if you have curled up naked babies, i'd go with the warm soil sow.
could also try changing up the nutes with sweeteners (i.e. molasses based flower finishers) as well. think that covers it, clean heist. i'm a ghost ghost ghost....
~dn
a few drops of peroxide and some humic really help with sprouting in general. But the humic makes it tricky to see if the seeds are really in there...Greetings everyone, after reading this thread it made me think of a write up another brother wrote on a different forum. I'm going to copy and paste it here.
@Captain Sternn and everyone trying to germinate the old gems. Best of fortune for germinating those old seeds. This planet needs more true Skunk weed.
"I thought I'd share my most successful method of germinating old seeds, I've had some great success using the following method..
Items needed..
1. fresh water
2. liquid Oxygen ( h202 - hydrogen peroxide)
3. Black Tea
4. Humic Acid
5 Kelp
6 tupperware ( sealable plastic container)
7. Tissue
8. heatmat
So, as old seeds are less vigorous than fresh seeds it's basically a race against time to get them off to a good start so you can get their tap root feeding as soon as possible before any bacteria/molds can take a hold and damage them. I tend to keep seeds away from any sources of mold spores etc. so soil is a definite no no for me, in fact, I keep them away from any growing media until they have totally shed their shells.
step 1..
add 2ml of liquid oxygen( 11% strength) to 100ml of fresh water. ideally in a small bottle container with lid so you can shake it.. add your seeds and shake vigorously for a minute and let sit in this solution for 20 minutes. ( this is purely to sterilize the seeds of any mold spores that are present)
Step 2
boil some water and soak 2 black tea teabags or 2 teaspoons of loose black tea in the hot water and leave to steep until the water is tepid. add the first 100ml of peroxide water to the tea water with the seeds and let soak for a day.
step 3
add 1ml of liquid humic & 2ml of liquid seaweed, or (2 pinches of powdered kelp and a pinch of powdered humic) to 100ml of water . add the seeds after you've drained the first solution of peroxide tea away. leave 24 hours, by this time some of the seeds may start to split their shells.
step 4.
Line a plastic container ( with lid) with tissue paper and wet it with the humic /kelp solution till quite wet but not puddles. add your seeds and place them onto a heatmat set to 24oc. Leave for a day and check daily, open the lid to allow fresh air in and reseal again, simply keep checking till all your seeds have germinated and have grown a taproot and shed their shells which happens easily in the sweaty high humidity environment)
I then prepare some coco coir or soi if you prefer and poke deep holes with my finger and carfully lower the taproot intop the hole carefully, leaving 10ml above the surface and carefully fill the hold with coir/soil. water with a light feed 0.8 EC with humic and kelp also. . put under a good light in a warm area and monitor daily to determine if need watering. Do NOT overwater, its a good idea if you arent sure to add 1ml per Litre of liquid oxygen to your first few waterings to reduce any chances of root rot. once they are growing, keep them fed and mist with weak feed/humic acid/kelp till strong and inoculate with mycorhizae.
View attachment 172263
View attachment 172268
View attachment 172280
below is an old article on seed germination in general if you wish to learn more..
https://www.breedbay.org/community/threads/seed-germination.5854/
happy germinating...
regards"
All credit goes to @Pistils. Thanks for sharing brother!
I wonder if this is why some people might use the gibberellic acid I'm not sure if it would be any better in that aspect or not.the humic makes it tricky to see if the seeds are really in there...
Oy, have you tried those older beans yet? You've got me curious.I wonder if this is why some people might use the gibberellic acid I'm not sure if it would be any better in that aspect or not.
I have not. If it's me that goes at them it would be like January. All I do indoors is germ and get them going. If any of them took I could keep them going until they can go outdoors. Seeds more likel;y to pop I wouldn't start on until early or mid March but these guys may take some time.Oy, have you tried those older beans yet? You've got me curious.
There are some very interesting tactics here that I will try. @whiteravenseeds jar method has my interest! Very good reads in this thread.