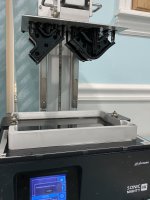
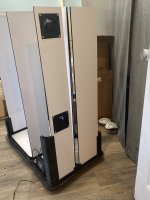
Stealth Grow Cabinet c. 1999 - now with modern grow equipment... finally

SproutASeed

In Bloom
Hi Everyone,
This is the first thread I would like to start in phenohunters.org.

Back in the late 90's I spent a lot of time on the forums and I was really interested in stealth grow boxes. I can't remember the forum, but I remember spending a lot of time thinking about a specific design with reasons behind every part of the design. A lot of people came together and discussed how the box should be and operate. I am designing and building a grow cabinet that utilizes the things I learned by studying stealth grow boxes back in the day.

I am using 3D printed parts, printed with a resin printer... Also, using greenhouse polycarbonate material that is 8mm thick, that is white/black/white blackout material and some plywood with flexiglass... Currently I am 3D printing parts, I will have about 2 weeks of 3D printing before I can show more... I have some parts on order from SendCutSend...

My background as a furniture maker really came in handy designing this grow cabinet...

I plan on outfitting the grow cabinet with AC Infinity parts. The cost for that is looking like $500.

Below is a rough drawing of the grow cabinet that was drawn on Fushion 360.
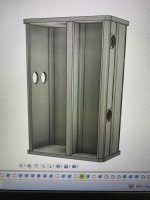
GrowCabinetV1.jpg

The grow cabinet features 4 compartments; the grow area is 18" x 18" x 42" in size. There is a utility compartment that is 12" x 12" x 42" that will hold the inline fan and carbon scrubber. Then the front right compartment is a seedling starting area and below is space to hold supplies and the humidifier...
 
Last edited:
Hi Everyone,
This is the first thread I would like to start in phenohunters.org.

Back in the late 90's I spent a lot of time on the forums and I was really interested in stealth grow boxes. I can't remember the forum, but I remember spending a lot of time thinking about a specific design with reasons behind every part of the design. A lot of people came together and discussed how the box should be and operate. I am designing and building a grow cabinet that utilizes the things I learned by studying stealth grow boxes back in the day.

I am using 3D printed parts, printed with a resin printer... Also, using greenhouse polycarbonate material that is 8mm thick, that is white/black/white blackout material and some plywood with flexiglass... Currently I am 3D printing parts, I will have about 2 weeks of 3D printing before I can show more... I have some parts on order from SendCutSend...

My background as a furniture maker really came in handy designing this grow cabinet...

I plan on outfitting the grow cabinet with AC Infinity parts. The cost for that is looking like $500.

Below is a rough drawing of the grow cabinet that was drawn on Fushion 360.
View attachment 178735

The grow cabinet features 4 compartments; the grow area is 18" x 18" x 42" in size. There is a utility compartment that is 12" x 12" x 42" that will hold the inline fan and carbon scrubber. Then the front right compartment is a seedling starting area and below is space to hold supplies and the humidifier...

this reminds me of maliboo's thread on the mills pride cabs we all used to build, i used mills pride or closetmaids for years back in prohibition days, before tents existed. subbed, should be fun to watch the build:)
 

Rosinallday

7th Day Seeds
Hi Everyone,
This is the first thread I would like to start in phenohunters.org.

Back in the late 90's I spent a lot of time on the forums and I was really interested in stealth grow boxes. I can't remember the forum, but I remember spending a lot of time thinking about a specific design with reasons behind every part of the design. A lot of people came together and discussed how the box should be and operate. I am designing and building a grow cabinet that utilizes the things I learned by studying stealth grow boxes back in the day.

I am using 3D printed parts, printed with a resin printer... Also, using greenhouse polycarbonate material that is 8mm thick, that is white/black/white blackout material and some plywood with flexiglass... Currently I am 3D printing parts, I will have about 2 weeks of 3D printing before I can show more... I have some parts on order from SendCutSend...

My background as a furniture maker really came in handy designing this grow cabinet...

I plan on outfitting the grow cabinet with AC Infinity parts. The cost for that is looking like $500.

Below is a rough drawing of the grow cabinet that was drawn on Fushion 360.
View attachment 178735

The grow cabinet features 4 compartments; the grow area is 18" x 18" x 42" in size. There is a utility compartment that is 12" x 12" x 42" that will hold the inline fan and carbon scrubber. Then the front right compartment is a seedling starting area and below is space to hold supplies and the humidifier...
Nice, glad you're sharing this. @Geodesyx is my brother.
 

SproutASeed

In Bloom
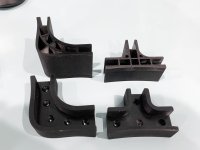
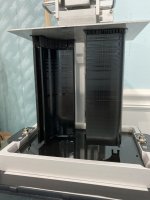
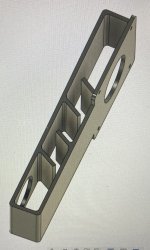
I went to the office early this morning and the 3D print was done... The office space I have to work out of is coming to an end at the end of September, so I have until then to get the cabinet completed. Check out the 3D print, I have to print this one 4 times and then on to the next parts...

3DPrint.jpg
 

SproutASeed

In Bloom
Hi Everyone,
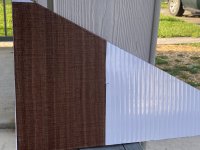
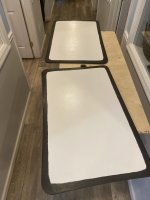
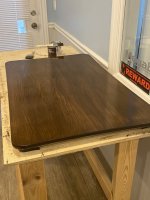
While I'm waiting on the 3D Printer to do it's thing, I thought I would post a photo of the White/Black/White 8mm greenhouse polycarbonate. It's covered with wood grain stick on vinyl... I really like that wood grain and think the cabinet will look sharp with that and black accents. When I was furniture maker, I would never have used veneer even, now in 2023 I feel good not using a lot of wood and this vinyl is pretty sharp looking...

PolyandVinyl.jpg
 

SproutASeed

In Bloom
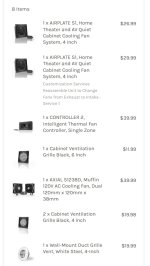
Went ahead and purchased the first round from AC Infinity, mostly parts I need to make fit or make holes for... Can't wait to get the good stuff later.

ACInfinityList.jpg

Some of the other parts, top and bottom of the cabinet, is coming in the mail from SendCutSend tomorrow... It is my birthday in September... all these goodies is a good gift. There's a pack of seeds I want, but this is more important right now... I was looking at Marshmallow OG x Candy Fumes, regs by Bloom Co.
 
Last edited:

SproutASeed

In Bloom
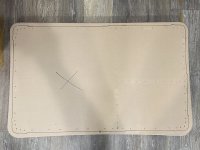
Got the top and bottom acrylic sheets in. The holes were perfectly placed and the screw holes of the 3D prints line up perfectly... I'm a happy camper. The next step is to use the form of the acrylic to copy it with plywood on a router table. I use a straight bit with a ball bearing to copy the shape, I'll take a photo to show when I get there.

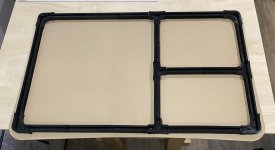
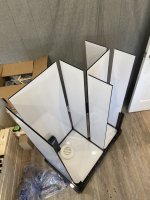
The black parts are 3D printed "Tracks" where the 8mm poly fits into... The corners fit 90 degree angle posts going 43 inches tall and then there's T posts that will also go 43 inches tall, creating all 3 compartments... there is a top that looks the same as the bottom and they fit on top of each other with the posts and poly sides in place, creating a box. There will be 3 doors...

This photo is a rough layout of the tracks, corners and Tees on top of the acrylic sheet. The acrylic is clear, the brown you see is a protective coating. The acrylic was cut with a laser cutter. Technology is so cool these days.
BottomLayourTracks.jpg
 

SproutASeed

In Bloom
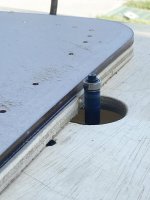
Took a photo while routing the plywood earlier today, basically I'm copying the custom cut acrylic sheets. I had the sheets custom cut mainly so that the holes for the tracks are cut in the correct places, making assembly much easier. While I was going to get it custom cut, I added some curves to it, meant for the top of the cabinet. Now, the bottom is currently the same, but I do plan on cutting and routing the bottom plywood with acrylic to the edge of the tracks... will take some photos...

Routering.jpg

Next I have to sand and finish the top and work on the bottom... the 3D prints are finishing up, I'm on the last print for the tracks... after the tracks, I will be printing the posts, estimated to take 16 days of printing. :)
 

webeblzr

In Bloom
WOW, all I made mine from was 1 x 2's, 2 x 2's, a sheet or 2 of luan, soffit vents. I made my doors and walls hollow, so I could move air through them.
I made small sliding vent doors, separating the veg area, from the flower area, with no light leaks.
Dang your build is amazing to me. I love it!
 

SproutASeed

In Bloom
WOW, all I made mine from was 1 x 2's, 2 x 2's, a sheet or 2 of luan, soffit vents. I made my doors and walls hollow, so I could move air through them.
I made small sliding vent doors, separating the veg area, from the flower area, with no light leaks.
Dang your build is amazing to me. I love it!
Thanks man, I'm glad you can appreciate what I'm making from your own build. This really is a revamp and a blast from the past in my opinion. My first box was just some plywood with compartments following things like no light leaks, act. I used to be a furniture maker back from 2000 - 2008 and I really like movement in furniture design. I'm trying to make something that is a furniture piece and once opened, with a surprising inside. It's not stealth, I have vents and fans showing on the outside...
 

SproutASeed

In Bloom
Showed up at work a couple days ago and the 3D printers vat was leaking onto the LCD screen, but I've had this happen before, so I have a LCD screen protector. It was such a big mess, but after some cleaning and getting a $10 part on Amazon, I am back to printing... I know 3D printing is not smooth sailing, it's part of what is to be expected.

This is a rather large print, 17 hrs. Six of these together makes up one post...
3DPrint2.jpg

Here we have 2 prints on top of each other... There are multiple mortise and tenon joints to glue the parts together once that time comes.
3DprintStacked.jpg

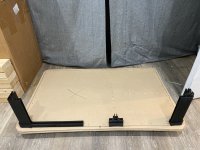
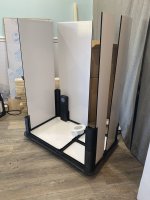
Bottom layout, I decided to keep the bottom like it is... I got 4 - 2" feet that it's sitting on top of.
Bottom1.jpg

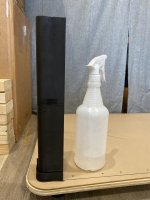
Last photo... showing 7" of the posts on each side...
Bottom2.jpg
Notice the tenons on the right side on the top of the post. That fits into the other side which is the mortise.
 

SproutASeed

In Bloom
Been working on the grow cabinet today...

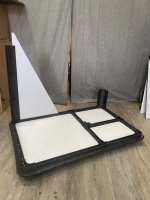
First I had to paint the top and bottom plywood... the insides. I attached the 3mm plexiglass to the painted plywood with the 3d printed tracks and screws...
painting.jpg

Here is the bottom with tracks attached... sitting on top of the feet that are fastened to the bottom.
Cabinet1.jpg

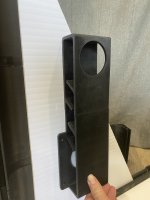
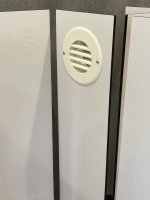
On the side I'm printing an air vent that will allow the inside of the grow cabinet to have an air inlet, but also keep it dark inside. The vent works by suction of the inline fan and carbon scrubber, sucking air from the grow section and blowing it into the utility room. The utility room also has a vent. Back in the day on OverGrow there were discussions about how light travels and what is needed to keep a dark grow cabinet... This is my little concept to make this happen. It's only 40mm thick. I'm printing this one at the moment... It's a 6 part print, will post photos when done.
AirVent.jpg
 

SproutASeed

In Bloom
The past 2 prints came out really well... This is the vent I'm working on and measures 12.5" in height. The soil container size that will fit the cabinet grow space is 10 gallons and measures 12 inches high. I'm thinking about placing 2 of these vents in the back of the cabinet blowing 5 inches above the soil container.

Ventprint.jpg
 

SproutASeed

In Bloom
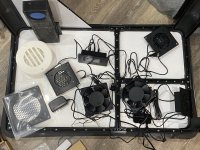
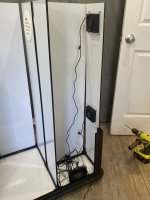
Got some AC Infinity parts in the mail today... Everything looks good, just so many wires. I'll have to ask my buddy to help me cut them shorter and solder them back together... most likely, should be easy to do once the cabinet is done... next I have to cut the polycarbonate sheeting to size... and keep on 3D printing... Looks like mid October for this to get somewhere close to completion.

ACInfinityParts.jpg
 
Top Bottom