coste
In Bloom
Hi all,
Figured I'd post up this tek that I've used for years when working with my preferred grain, wild bird seed (WBS). This is not my original work, though the pics are from my endeavor this weekend.
What you'll need:
- Choice jars. I'm using standard pint jars this run; you can use whatever you want.
- Wild Bird Seed. Try to buy stuff that has minimal sunflower seeds in it.
- Water, obviously. Tap is fine.
- Pressure cooker. You can sterilize the jars without one, but it's a week long endeavor and results still aren't 100%.
- RTV if you're prepping jars/don't have cool self injection port do-dads.
Prep:
This round I'm starting fresh, so I had to prep some jars. I didn't add vents for gas exchange this round -- gonna try something out. We'll see what happens.
Anyways, I took a 5/16" drill bit and punched on hole per lid, then filled those holes with RTV.
You can get this silicone stuff at an auto parts store/big box store/neighbor. It's high temp gasket maker. Invaluable to have around for other purposes, so go buy some dammit.
Anyways, you want to do this in the morning before you start the seed prep -- RTV takes 24 hours to cure, so if you're after instant gratification, this step ain't for you. Here's what the final lids look like.
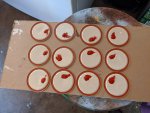
If I were to add vents, I'd drill a 1/2" hole opposite of the RTV'ed port, and pack it with Polyfill. Find one of your kid's forgotten stuffed animals and gut it for the white fluff, or go buy a bag. It's cheap. Also good to have around for when your kid realizes you've gutted their best friend from a decade ago.
Process:
Now, you'll want to take one of your jars. Fill it about half way with seed. This is important. If you fill it to where you expect to fill the jars after cooking the seed, you'll end up with way more than you need. That means waste. We aren't the wasteful type around here, so plan accordingly.
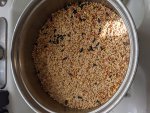
Dump all of it into a pot. Fill the pot up till the seed is covered by a knuckle or two of water.
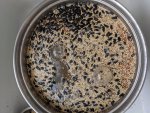
See all that shit floating up top? Get it out of there. This is waste. Hollow seeds, sunflower seeds, generally useless stuff for our purposes. Mix the seed up, more of that garbage will float up. Repeat until you've got all the floaters removed. Now, set this to the side, and go do your thing. You'll want to leave this pot to soak for 12 - 14 hours. You're hydrating the seed at this point, and also helping break down any antifungal/anti-whatever coatings they're applied to the seed.
In my case, the next morning I had this:
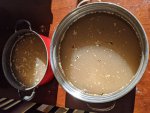
Now, you'll want to dump that soaked seed into something that'll contain it and let the water out. I use a collander and some window screen - I'm sure the pros have some fancy cookware for this step. This is what it looks like in my case:
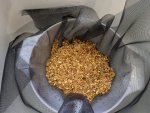
Now, rinse this thoroughly. You want the run off coming through that seed to be clear before proceeding. You're working to remove any of the expelled starches, waxes, anti-whatevers, bacteria, etc. It's important, so do your best here. Once you're done, throw that seed back into your rinsed pot, and cover it with an inch or two of water again.
Throw that pot on the stove, and bring it to a boil. Once it's boiling drop the heat to maintain a nice simmer.
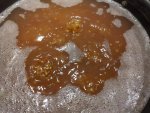
Stir the seed. Keep an eye on it. What you're doing here is forcing the seed to achieve field capacity for moisture content. You'll know you've achieved that when some of the seed hulls start to split and show you some seed pulp. When that happens, dump the seeds back into your strainer, and rinse them again. Same rule, you want clear runoff. Your results should look something like this:
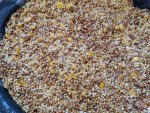
Cover it with a towel, and let it sit for an hour or so. You want all the runoff drained -- excess moisture + confined space + no airflow = bacterial infections even after PCing.
Now, fill your jars about 3/4 of the way full. Clean the outer rim, put a piece of tyvek with the moisture retention side down, lid, and ring. Wrap the top with some foil, pressure cook @ 15 PSI for two hours, and let cool to a handle-able level. Shake the shit out of the jars when they're still hot but not skin-graft-necessary hot. Let cool to room temp, knock em up, and incubate.
I've had my most successful runs using this tek, with the lowest contam rates. I've found it easier than using popcorn to properly get to field capacity and like the smaller grain simply because it offers more innoculation points when working with bulk substrates.
Happy growing, all!
Figured I'd post up this tek that I've used for years when working with my preferred grain, wild bird seed (WBS). This is not my original work, though the pics are from my endeavor this weekend.
What you'll need:
- Choice jars. I'm using standard pint jars this run; you can use whatever you want.
- Wild Bird Seed. Try to buy stuff that has minimal sunflower seeds in it.
- Water, obviously. Tap is fine.
- Pressure cooker. You can sterilize the jars without one, but it's a week long endeavor and results still aren't 100%.
- RTV if you're prepping jars/don't have cool self injection port do-dads.
Prep:
This round I'm starting fresh, so I had to prep some jars. I didn't add vents for gas exchange this round -- gonna try something out. We'll see what happens.
Anyways, I took a 5/16" drill bit and punched on hole per lid, then filled those holes with RTV.
You can get this silicone stuff at an auto parts store/big box store/neighbor. It's high temp gasket maker. Invaluable to have around for other purposes, so go buy some dammit.
Anyways, you want to do this in the morning before you start the seed prep -- RTV takes 24 hours to cure, so if you're after instant gratification, this step ain't for you. Here's what the final lids look like.

If I were to add vents, I'd drill a 1/2" hole opposite of the RTV'ed port, and pack it with Polyfill. Find one of your kid's forgotten stuffed animals and gut it for the white fluff, or go buy a bag. It's cheap. Also good to have around for when your kid realizes you've gutted their best friend from a decade ago.
Process:
Now, you'll want to take one of your jars. Fill it about half way with seed. This is important. If you fill it to where you expect to fill the jars after cooking the seed, you'll end up with way more than you need. That means waste. We aren't the wasteful type around here, so plan accordingly.

Dump all of it into a pot. Fill the pot up till the seed is covered by a knuckle or two of water.

See all that shit floating up top? Get it out of there. This is waste. Hollow seeds, sunflower seeds, generally useless stuff for our purposes. Mix the seed up, more of that garbage will float up. Repeat until you've got all the floaters removed. Now, set this to the side, and go do your thing. You'll want to leave this pot to soak for 12 - 14 hours. You're hydrating the seed at this point, and also helping break down any antifungal/anti-whatever coatings they're applied to the seed.
In my case, the next morning I had this:

Now, you'll want to dump that soaked seed into something that'll contain it and let the water out. I use a collander and some window screen - I'm sure the pros have some fancy cookware for this step. This is what it looks like in my case:

Now, rinse this thoroughly. You want the run off coming through that seed to be clear before proceeding. You're working to remove any of the expelled starches, waxes, anti-whatevers, bacteria, etc. It's important, so do your best here. Once you're done, throw that seed back into your rinsed pot, and cover it with an inch or two of water again.
Throw that pot on the stove, and bring it to a boil. Once it's boiling drop the heat to maintain a nice simmer.

Stir the seed. Keep an eye on it. What you're doing here is forcing the seed to achieve field capacity for moisture content. You'll know you've achieved that when some of the seed hulls start to split and show you some seed pulp. When that happens, dump the seeds back into your strainer, and rinse them again. Same rule, you want clear runoff. Your results should look something like this:

Cover it with a towel, and let it sit for an hour or so. You want all the runoff drained -- excess moisture + confined space + no airflow = bacterial infections even after PCing.
Now, fill your jars about 3/4 of the way full. Clean the outer rim, put a piece of tyvek with the moisture retention side down, lid, and ring. Wrap the top with some foil, pressure cook @ 15 PSI for two hours, and let cool to a handle-able level. Shake the shit out of the jars when they're still hot but not skin-graft-necessary hot. Let cool to room temp, knock em up, and incubate.
I've had my most successful runs using this tek, with the lowest contam rates. I've found it easier than using popcorn to properly get to field capacity and like the smaller grain simply because it offers more innoculation points when working with bulk substrates.
Happy growing, all!
Last edited:

