Chucked by Buck

Buck5050

Underground Chucker
:passjhomie:

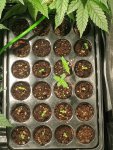
Still be exercising my seed popping muscles. Most of the GorillaBlues I cracked a few days ago are going their thing. PXL_20200930_003228642.PORTRAIT.jpg

This seedling mix is 80% peat and 20% vermiculite.

This is a prime example of how not germinating seeds at the same time can make selections more difficult later on. The bigger two are only five days older.
 

Buck5050

Underground Chucker
The smell gave me flashbacks to the '80s when my old man would be passing his bong around. Very classic weed smell and very pleasant. Has some skunky undertones with some earthiness and musk. I do get slight mellow chocolate come through after the initial blast of scents. Unique in comparison to all the citrus aromas around the place at the moment. She impresses more and more each day. I did pluck out a bean the other day and it had hardened up but was really light and still green. I will check in a couple more weeks.
 

Buck5050

Underground Chucker
PXL_20201002_030419030.PORTRAIT-02.ORIGINAL.jpg
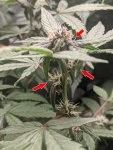
This is a close-up shot of the CandyMan branch I set the baggie around a few days ago. You can see the lower pistils have darkened up which is a sign that they have dragged in the GG75 pollen. For me the lowers are the telltale sign that everything went as expected. Sometimes the upper flower on the branch can look a bit beat up if the baggie smashes down on the young pistils making them turn brown from damage. Here I am seeing some decent pollination throughout the area the baggie covered. I am expecting 25-50 seeds from this attempt.
 

Buck5050

Underground Chucker
Plucked another bud from the BlueRipper#5 cut that is suffering from BudRot this outdoor season. She's still alive but is looking worse for wear.
PXL_20201002_180746144.jpg
She goes another week or two and comes down. Judging by the striping on a few of these she might reward my persistence.

The GG4s1 cut I set beside the rotting BlueRipper has been chugging along with no issues.
PXL_20201002_180908713.PORTRAIT-01.COVER.jpg
Did my first seed maturity inspection (SMI?:ummok:) on her as well
PXL_20201002_181036583.PORTRAIT.jpg
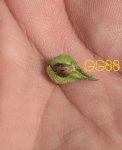
:superhappydance: If all the beans look like this then she's good to go now but I'll give her another week to 10 days. I am in no hurry and that should help mature some stragglers if need be.

PXL_20201002_180851800.PORTRAIT-01.COVER.jpg
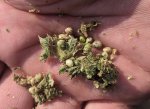
Holding a big batch of GorillaBlues seeds. This is to extend my first-generation seed stock.
PXL_20201002_180901245.PORTRAIT-01.COVER.jpg
Another cut of the BlueRipper#5 holding a large batch of BlueRipper F2s. :alert: If you know, ya know. No rot or health issues on this one,
 

Frimpong

🔥Freak Genetics🔥
Plucked another bud from the BlueRipper#5 cut that is suffering from BudRot this outdoor season. She's still alive but is looking worse for wear.
View attachment 30756
She goes another week or two and comes down. Judging by the striping on a few of these she might reward my persistence.

The GG4s1 cut I set beside the rotting BlueRipper has been chugging along with no issues.
View attachment 30757
Did my first seed maturity inspection (SMI?:ummok:) on her as well
View attachment 30758
:superhappydance: If all the beans look like this then she's good to go now but I'll give her another week to 10 days. I am in no hurry and that should help mature some stragglers if need be.

View attachment 30759
Holding a big batch of GorillaBlues seeds. This is to extend my first-generation seed stock.
View attachment 30760
Another cut of the BlueRipper#5 holding a large batch of BlueRipper F2s. :alert: If you know, ya know. No rot or health issues on this one,
Man I'm in the same exact boat . Waiting game . Lol, gg4 and gorilla Skittles going myself. Good taste my man !
 

Buck5050

Underground Chucker
I wanted to highlight how I personally go about collecting pollen. I feel this method is fairly streamlined and easy to do for most small growers who are trying to make some of their own seed.

A couple of things to keep in mind when messing around with pollen:
1. It is very messy and impossible to contain
2. It also can almost become invisible once it is airborne
3. If your lungs are sensitive wear something to protect yourself
4. Static electricity can make certain tools very difficult to use.
5. Moisture can neutralize and make pollen inert.

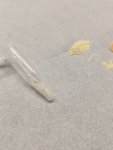
Some of the items I used to collect and store pollen.
Parchment paper
clothespins type clips
plastic scraper
tweezers
plant ties
trimming snips
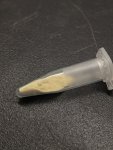
mini-centrifuge vial
baked rice

PXL_20200926_162046948.jpg
For me, I have found that using parchment paper is a must. This stuff is foldable and the pollen separates from it with not much effort.


PXL_20200926_161937554.jpg
I end up grabbing a plastic dome but any container will work as long as it is a few inches deep.
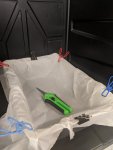

PXL_20200926_162511287.jpg
I tore off enough paper to form a bowl-like catch container. I used some clips to secure the paper in place.
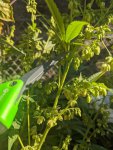

PXL_20200926_162939218.jpg
For this example, I am using a male but you could do this with a reversed female also. Best results are had once you see about half the male flowers opened and pollen already has started to fall onto the lower leaves. With some snips, I end up taking a few of the bigger leaves off so that pollen can fall freely.
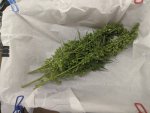

PXL_20200926_163401357.jpg
Once that is done I snipped off some mature tops and take them to a location that there is little air movement. Moving male flowers around like this will release pollen. I move very slow and cover them while I transport.
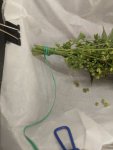

PXL_20200926_163557243.jpg
Using some plant ties I group a few tops together and tie them like I was going to hang dry any other herb.
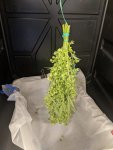

PXL_20200926_163639643.jpg
I place the catch container underneath and hang the flowers in a dry location with very little air movement. Totes work well.
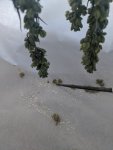

PXL_20200927_185551478.jpg
Over the course of a few days, pollen will fall on its own. I do also tap on the tops lightly here and there which helps release a bit more pollen. A few male flowers and plant material will fall with the pollen.

PXL_20201002_173855989.jpg
Using tweezers or a plastic scraper I remove the majority of plant material. Pick up the container and tilt and tap lightly moving the pollen into a pile. On this final stretch is where you'll want to not drop or even shake the paper too much. Un-clip and remove the parchment paper from the container. Gently fold it while considering the pollen on the inside. I hold it on an angle you can lightly tap it and the heavier plan materials fall away from the pollen making it very easy to remove. You'll want to move the pollen around with the scrapper or a plastic business card while keeping an eye for specs of unwanted or leftover material.
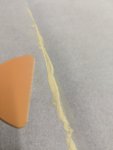
PXL_20201002_175244810.jpg
It doesn't take long to be left with pure pollen
 

Buck5050

Underground Chucker
PXL_20201002_175441465.jpg
I use rice to help keep the pollen dry while I store it so I place a few inside a vial. Once I have the pollen in a pile I crease the end of the parchment paper and poured into the vial. Tapping the parchment paper helps it slide down the crease. I also thought about using the scrappers and picking it up dropping it in the vial. Either way would be effective.
PXL_20201002_180244165.jpg

I always keep a spray bottle handy so I can spray the area after I am done working with this stuff. I spray the tools and the paper and even the leftover male flowers. If you have females in flower, change your clothes and always be aware that this stuff can get everywhere.
 

horribleherk

home grown
View attachment 30810
I use rice to help keep the pollen dry while I store it so I place a few inside a vial. Once I have the pollen in a pile I crease the end of the parchment paper and poured into the vial. Tapping the parchment paper helps it slide down the crease. I also thought about using the scrappers and picking it up dropping it in the vial. Either way would be effective.
View attachment 30811

I always keep a spray bottle handy so I can spray the area after I am done working with this stuff. I spray the tools and the paper and even the leftover male flowers. If you have females in flower, change your clothes and always be aware that this stuff can get everywhere.
Good stuff ! I have a chuck I'm wanting to make so I'm gonna be scouting around to see what others are doing
 

Buck5050

Underground Chucker
Looking forward to seeing what you come up with @horribleherk (y) A little cannabis breeding during retirement sounds like a dream to me. I'll be around if you have any questions.

These methods that I have showcase have worked quite well for me . But, I do want to reiterate that I believe, hands down, for best results without fail, flower the male and female side by side as natural as possible. Some of these techniques I have documented do take some understanding and can end up with some undesirable results for the least experienced. I do however encourage everyone to dip their toes in the pool and gain a bit of pollen education because it leads to some interesting genetic exploration.
 

MO_Grow

Underground Chucker
Killer write-up my dude!! I like the chop and hang when they're dropping...not sure why I've never thought of that before, but sounds like common sense now ?
That static electricity is a sob! I sometimes get frustrated trying to collect keif from my trim bin cause shitt just kicks and flies around... Not as bad as pollen does, but still. With pollen, I've tried parchment, foil, and plastic bins for collecting and parchment was by far the easiest to collect from... Plastic, like a trim bin being the worst/hardest, especially using a plastic card to scrape with. That said, think I'm gonna line my trim bin with parchment from now on ??
 

horribleherk

home grown
Looking forward to seeing what you come up with @horribleherk (y) A little cannabis breeding during retirement sounds like a dream to me. I'll be around if you have any questions.

These methods that I have showcase have worked quite well for me . But, I do want to reiterate that I believe, hands down, for best results without fail, flower the male and female side by side as natural as possible. Some of these techniques I have documented do take some understanding and can end up with some undesirable results for the least experienced. I do however encourage everyone to dip their toes in the pool and gain a bit of pollen education because it leads to some interesting genetic exploration.
Thanks buck it has been about 10 yrs since I've done a chuck lol I'm wanting to cross 2 old California classics trainwreck -×-grape stomper aka sour grapes as I live in the county of the frog jumps I'm wanting to call it frog wreck or frog stomper calaveras co. Mascot is big frog lol
 

Buck5050

Underground Chucker
End of week 4
PXL_20201003_010410047.PORTRAIT-02.ORIGINAL.jpg PXL_20201003_010437782.PORTRAIT-02.ORIGINAL.jpg


PXL_20201003_010429860.PORTRAIT-01.COVER.jpg
I was able to straighten her out but once I started back in on boosting the P and K she has decided to throw more brown spots, Everything else is happy as can be with the nutrient mix. She clones super easy and smells great but this touchiness is an outlying condition that will likely lead to one and done.


PXL_20201003_010359277.PORTRAIT-02.ORIGINAL.jpg
Tallest trichomes in the tent at this stage.


PXL_20201003_010339340.PORTRAIT-02.ORIGINAL.jpg
Fruity
 

Idlewilder

Underground Chucker
Looking great man! It’s fun to see the similarities between our 1’s and 2’s. Can you share some full plant shots? I’m debating on whether to chop mine this weekend or push it another week. Super dew is upon us in New England so everything is saturated until the sun is high in the sky
 

Buck5050

Underground Chucker
Super dew is upon us
If you want to take them longer but are worried about moisture causing issues, I have used a leaf blower to move air across them and knock off the droplets. Of course, it could smell up the block...

I'll pull the girls out and see if I can get some full-plant shots here in the few days. Are you looking for a full profile shot from the side? and maybe a top-down? Let me know.
 
Top Bottom